Homemade Garlic Dill Pickles
Author: WooPigFoodie
Ingredients
- 4 pounds pickling cucumbers
- 1 bay leaf
- 1-2 garlic cloves (at least one, use more if you have extra cloves; it's actually better if you chop the garlic or use the store-bought chopped chunks, because it better distributes the garlic flavor)
- 1-2 sprigs of fresh dill (at least one, but if you have leftover dill, split it up among the jars)
- 1 small hot pepper (whatever you like; I use what is currently growing in my garden, but you can buy anything that you like for heat, or your store has in season; I also like a teaspoon of Aleppo pepper in place of or in addition to the fresh hot pepper)
- 1 teaspoon of mustard seeds
- 1 teaspoon of black peppercorns
- 1 teaspoon of whole round coriander
Instructions
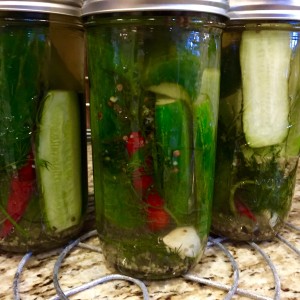
- You'll need 4 pounds of pickling cucumbers. These are small 5-6 inch cucumbers with a nice bumpy surface. Remove their blossom ends (that's where the root connects, and looks like a brown belly button.)
- Cut the cucumbers in half lengthwise if you like, and then fit them loosely into 6 pint or 3 quart sized mason jars.
- Once all of the pickles are in the jars, add in the flavoring ingredients. Add one bay leaf, 1-2 garlic cloves (at least one, use more if you have extra cloves; it's actually better if you chop the garlic or use the store-bought chopped chunks, because it better distributes the garlic flavor), 1-2 sprigs of fresh dill (at least one, but if you have leftover dill, split it up among the jars), a small hot pepper (whatever you like; I use what is currently growing in my garden, but you can buy anything that you like for heat, or your store has in season),1 teaspoon of black peppercorns, and 1 teaspoon of whole round coriander.
- Now its time to heat up the brine. In a large pot, heat to boiling three cups water and 2¾ cups of cider vinegar or white vinegar. Add in ¼ cup pickling salt and stir to dissolve.
- I like nice, crunchy pickles, so I add in Ball Pickle Crisp according to the directions (it had other seasonings, which you can see in the above picture). My books stay that you can add 1-2 grape leaves or sour cherry leaves to the jars instead, and those will keep the pickles nice and crisp.
- Pour the liquid over the jars, leaving ½ inch of headspace at the top of each jar.
- Close up your jars and process them in a boiling water bath. You have two choices for this. I like to process them at a lower temperature to help keep them crispy. You can ONLY do this for pickles, not for any other product you can. Under this low-temperature method, you will cover the jars with water 1 inch over their tops, and process them in 180 degree water for 30 minutes. I leave a kitchen thermometer in the pot the whole time so that I can monitor the temperature and make needed adjustments to the fire. Under the standard processing method, you will also cover the jars 1 inch over their tops with hot water, and boil them for 10 minutes if using pint jars and for 15 minutes if using quart jars.
- When they are done, you pull them out and let them cool down on the counter. You'll hear them pop as they cool and the seals are made.
- The standard rules apply. If when you get around to opening these, if they look or smell funky, are foamy, are effervescent, are moldy (even a little bit) or have an odd slipperiness, pour them down the drain. It's not worth the risk.
Recipe by WooPigFoodie at https://www.woopigfoodie.com/homemade-garlic-dill-pickles/